Disassembly guide for Leuchtpistole
In this part, we will deal with
the disassembly, step by step, of model 34 (or Heer Model because of minor differences between
them).
Indeed, the dismantling of the model L (Luftwaffe) and SL / SLD (Kriegsmarine) are relatively complex, while the LP42 model is based on use of rivets.
The four types are described here below:
Link to the Luftwaffe flare gun model disassembly guide: HERE
Disassembly of the LP34 and Heer model:
To return to the more common Heer model and help us, we will rely on the following guide:
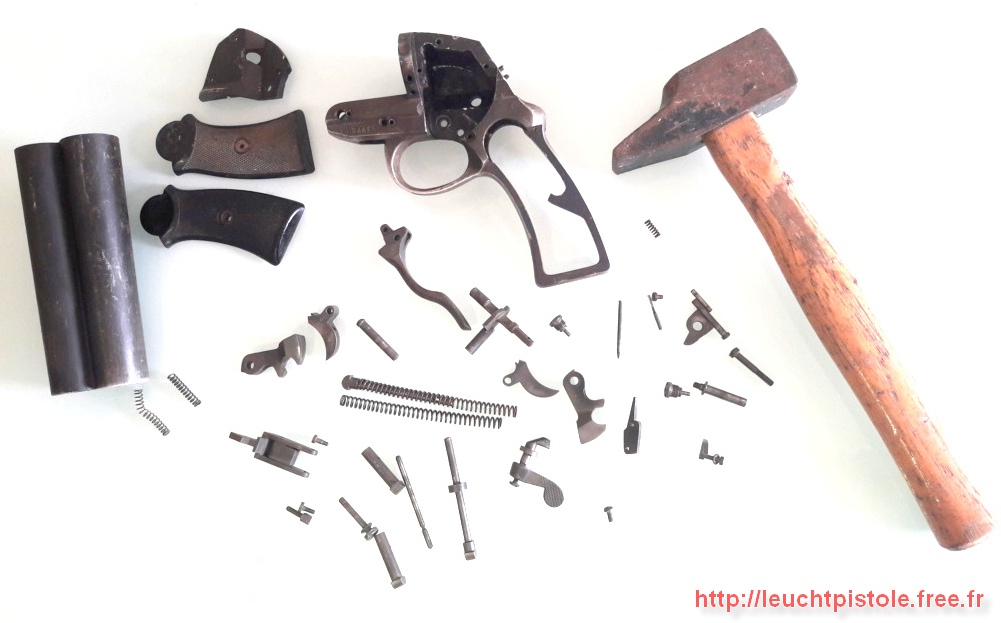
Exploded the PLF (here a model Z (Kampfpistole) which is not
different from a Mod. Heer or Mod. 34 (the rifled barrel is the only change).

Assemblies and parts (always Mod. Z recognizable with the rifled barrel).

The various steps in
disassembling the PLF (or LP) are:
Step 1: Verification of no cartridge in the barrel.
Step 2: LP disarmament of (pressure on the trigger - by retaining the
hammer -) to ensure that no spring is armed in the carcass.
Step 3: Dismantling butt pad.
Step 4: Removing the screws to disengage the trigger block.
Step 5: Switch block trigger.
These steps are described in the original manuals (like these):

This step by step disassembly guide has been done by Peter, a very kind collector. Great thanks to him again.
For this surgical operation, the following tools are necessary:
One normal hammer, screwdriver, a steel punch, opener for bottle and your leuchtpistole:

To start: Remove the screw with a well fitting screwdriver. Push firm and turn slow, don't mess the head!

Take off the grips by lifting the buttom a little bit and slide them carefully downwards.
Put the grip on a piece of wood to avoid damage and push down with the screwdriver the head of the mainspring by tapping it with your hand.

Like this:

To get the following result:

Next step: remove the joint bolt. This is the ONLY TIME we use the HAMMER!!!
Location:


Now the bolt is out !
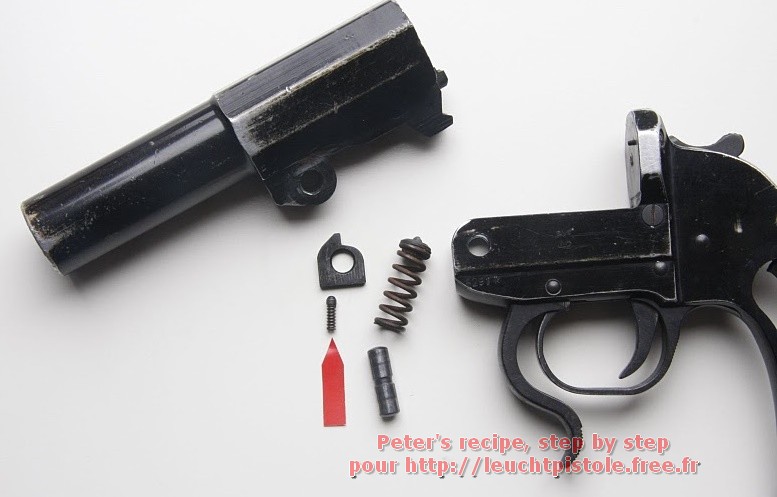
Take of the upper part / barrel of you LP. Be carefull: you will meet two
springs, a small and a big one. Also a small metal plate
called: "Auszieherzahn" will come out.

Now here the big trick for the next steps......take the gunpart in your
right hand like in the picture with the grip upside-down. Push firm with
your thumb.
You will see the triggerguard will move foreward some millimeters. Push harder when it don´t move....You will see a small part will come out of the frame.


And some more:

Now it's time to remove the tap bolt / Hahnbolzen. Do it carefully just by giving some pressure by hand. DO NOT USE THE F**** HAMMER! It will damage your gun seriously!

Do not yet remove the 'Hahn'. Now, on the same way, remove the triggerbolt careful:

After removing both bolts you can take out the complete triggergroup and the Hahn, see below:

Details:

See the differences between the bolts!

The, remove the last bolt for release the closure-lever (Verschlushebel):

Here you can see why you can not use a hammer or any force to remove these small bolts: they are locked/secured internal.


The LP (Leuchtpistole) is now disassembled (summary disassembly for routine maintenance).
The assembly / winding is done by following the steps in the opposite direction.
Exploded view of the LP42 model (dark scan unfortunately)

And the step by step guide (click on the picture here below):

Sl model disassembly (Kriegsmarine model)
Just click on the here below picture to access the step by step tutorial to disassemble this nice model.

Back